It’s about time I start explaining how to combine great plugins publicly available to get the best results with your blog. Thinking about it, I’ve decided to start a series of posts on the plugins I think you’ll greatly benefit from. Starting today, every week I will talk about some new plugin. At a weekly rate, I think we’ve got at least 2 months of exciting plugins to be discovered! :)
Intro
What is one of the most important things about blogs? Why, sharing the content, of course! If you’re struggling to find an easy way for your visitors to share your posts with others – look no more. Sociable is a great plugin that will help you give your visitors an option of sharing posts through almost any well-known social bookmarking website (61 website is supported as of Sociable 2.0).
Peter Harkins is the developer behind this plugin, although originally Sociable was written by Kirk Montgomery.
How it works
After each post of yours, you will see a toolbar similar to this:
When you hover your mouse pointer over a particular icon, it is shown in vivid colours and you get a pop-up note with the name of the website, like this:
When someone clicks one of these icons, a relevant social bookmarking website opens with a standard page for sharing a link to your post with others. If visitor is not logged in in a particular service, then username and password will be asked first. Login and sharing pages vary in their design and complexity, but Sociable takes care of the most important part of sharing links: it automatically generates URLs understood by social bookmarking websites, so that whenever a sharing page opens, it already has the proper URL of your post.
Configuring Sociable
Once you upload plugin into your WordPress plugins directory (Sociable has all its files in a separate directory), simply activate it from the Plugins management panel of your WordPress Admin section. After this, in Admin’s Options you’ll see a Sociable tab with configurable sections:
1) Websites to be represented on Sociable toolbar
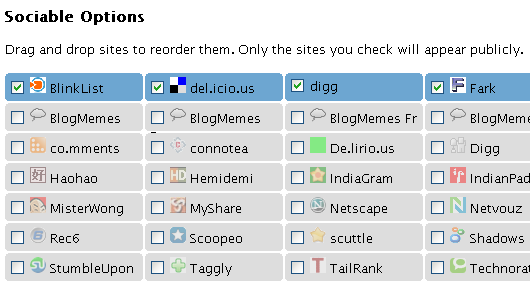
Out of a menu of many sites, which looks like this:
… you’ll be able to select only the websites you would like to be offered.
As you can see from this illustration, you can simply tick the websites you like. Also, as the instruction suggests, you can drag-and-drop options to achieve the perfect order of icons to be shown on your Sociable toolbar.
2) Text to introduce the Sociable toolbar.
You can type any phrase you like (and yes, there’s a default one too) – whatever you think will motivate most your visitors to bookmark your posts.
3) Sociable visibility options
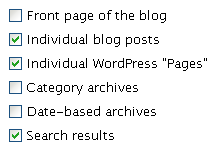
This is a group of tickbox options at the bottom of the screen, which allows you to precisely limit the visibility of Sociable plugin. For instance, that’s the place to disable Sociable for your main page or archives pages. My personal preference is to show Sociable toolbar for posts and pages with useful content only, so I disable the front page and archives options:
Conclusion
I think that’s all you need to know about this plugin. It’s definitely one of the must have plugins in my opinion. Give it a try and I’m sure you won’t regret it!
External links:


Thanks for the interview link!
Thanks for stopping by, David! Always a pleasure to share great posts like yours with my readers.