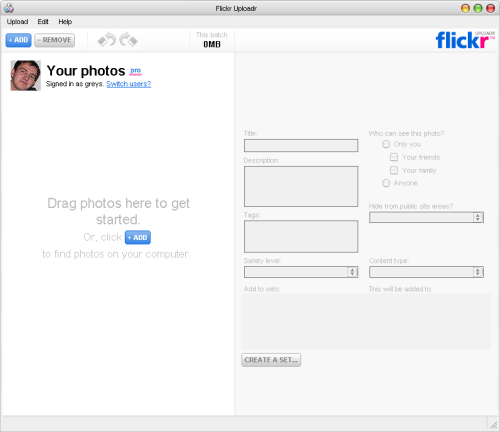
Many of you have probably notice the recent update of a Flickr Uploadr – a great tool for bulk uploads of your new photos to Flickr. I’ve been a fan of Flickr for quite some time, and plan to use it for photo streams on some of my blogs in the near future.
I absolutely love the new interface and yet simpler and more effective interface of the 3.0.x beta, but was, like most of you, startled to find out the proxy unfriendliness of Flickr Uploadr 3.0.x.
There’s no mentioning about proxy configuration in the Settings dialogue, and that’s why you will have to fix it yourself. Luckily for all, it’s not a complex process.
Configure Flickr Uploadr to use proxy
Here’s what you need to do:
1. Make sure Flickr Uploadr is closed
2. Confirm your current proxy configuration
Internet Explorer proxy settings
In Internet Explorer, go to the Tools menu, pick the Internet options menu, then select the Connections tab and click the LAN Settings button:
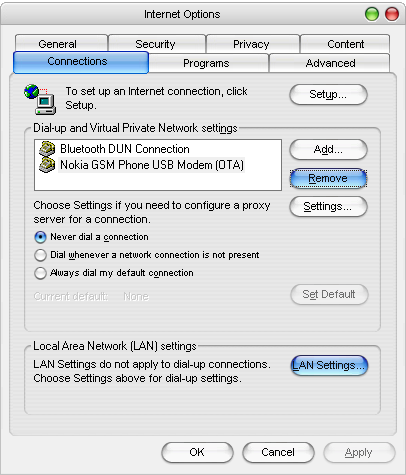
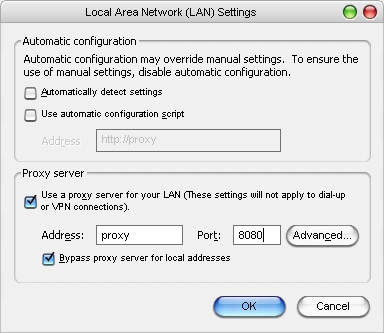
After this, you will see the current proxy settings. Simply take note of the name of the proxy server (proxy on the sreenshot) and its port (8080 in my case):
Proxy settings in Firefox
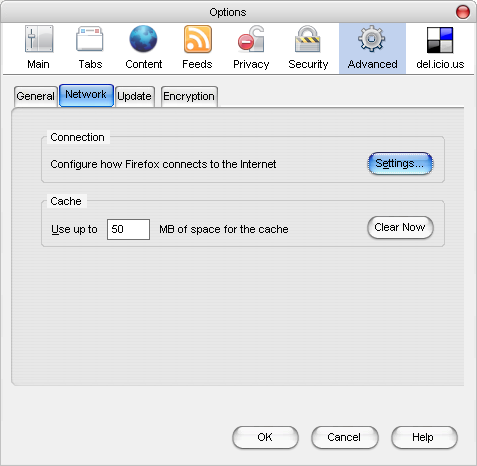
And here’s how your proxy settings window will look. Once again, note the name of the server (proxy in this example) and its port (8080, which is pretty standard):

3. Locate the configuration file for your Flickr Uploadr.
Most likely, it is called C:\Program Files\Flickr Uploadr\defaults\preferences\prefs.js
4. Add the proxy settings to Flickr Uploader config file
Open the file in any text editor (Notepad, for instance) and add the following lines to this file (replace the AAA.BBB.CCC.DDD with the IP address of your proxy server):
pref(“network.proxy.http”, “AAA.BBB.CCC.DDD”);
pref(“network.proxy.http_port”, 8080);
pref(“network.proxy.type”, 1);
Important: Make sure you’re saving the file as clear (ASCII) text, and not a Microsoft Word or RTF document!
Notice: The type of a network proxy should be 1 for manual (direct) proxy server configuration, while for PAC (automatic proxy configuration scripts) it should be 2. Try value of 1 first, then 2 if it doesn’t work.
5. Restart the Flickr Uploadr
6. Enjoy!
That’s it! Let me know if you need any further help with getting your proxy to work.
Like flickr? Buy this book!
 |

It should be something like this.
pref(‘network.proxy.http’, ‘myproxy.domain.com’);
pref(‘network.proxy.http_port’, 8080);
pref(‘network.proxy.type’, 1);
Notice that it should be an apostrophe instead of quotes. Also, I was able to get it to work with proxy type as 1 and not 2. That part I am not sure why.
Type 1 proxies are “manually configured” and type 2 are for configuration scripts.
http://kb.mozillazine.org/Network.proxy.type
Awesome tutorial, Thanks!
Thanks for great comments! It’s a very good point regarding the type of a proxy – I believe we have our proxy server available through both direct and script-configured connection.
Worked! :) thanks a lot!
Excellent !!!
This should be documented on the flickr site itself or better, the configuration of the proxy should be configurable from the Uploadr GUI !
Thanks anyway, that worked for me :)
Xav
I had to change from 8080 to 80 because 8080 is blocked by our firewall
I had to replace the double quotes with single quotes to get it to work.
Thanks
Thanks!